

How To Repair Fiberglass Scrapes
Gelcoat Scratch Repair
Surface scratches can be buffed out of gelcoat with polishing compound, but deep scratches must be filled. When the gelcoat surrounding a scratch is in good condition, the filler of choice is gelcoat paste, which provides both filler and finish in a single application — merely not a single step. Because the surface of the cured paste will be uneven, sanding and polishing are required to polish the repair and blend it with the rest of the hull. Except for color matching, gelcoat repairs are like shooting fish in a barrel and straightforward.
Gelcoat Choices
You will observe gelcoat available as both a resin and in a thicker putty form chosen paste. For scratch repair you want paste. Repair kits comprised of a small amount of gelcoat paste and hardener, a option of pigments, mixing sticks, and sealing film can exist purchased for less than $xx. Buy a flexible plastic spreader if you don't already have one. You will also demand sheets of 150-, 220-, 400-, and 600-grit wet-or-dry sandpaper. A unmarried sheet of each will be more than ample to fair all the paste in a repair kit.
Colour Matching
The hardest part of a repair to the surface of a fiberglass boat is matching the color. Professionals who do gelcoat repairs daily nonetheless have difficulty getting a perfect match. Even "mill" colors don't match exactly subsequently a boat has been in the lord's day for a few years.
White has the meaning advantage of existence fairly easy to match, and in one case a small repair is buffed out to a gloss, shading differences will exist unnoticeable. Matching colored hulls is somewhat more challenging.
A colour-sample menu from your local paint shop that matches your hull tin provide valuable help. Inquire the store clerk the formula; they custom-mix the color by adding tints to a white base. The formula may call for a 6 different tints, simply the important ones are those specified in the largest quantities. You can use the tints in your repair kit to approximate the formula.
Always colour gelcoat paste before you add together the goad. Put exactly one ounce of paste into a mixing cup and add together the tints a drib at a time. Go on track of the number of drops of each tint. When the colour looks close in the loving cup, touch a drop of the mix onto the hull. Brand needed adjustments until you are satisfied with the lucifer — don't expect perfection — then write down the formula and so you lot can duplicate it for the rest of the paste.
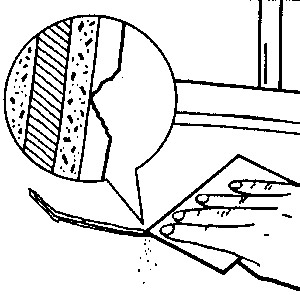
Preparing the Scratch
Never try to repair a scratch past simply painting over it with gelcoat. Gelcoat resin is too thin to make full a scratch and gelcoat paste is too thick. Instead of penetrating scratches, gelcoat paste will span them, leaving a void in the repair. To get a permanent repair, depict the corner of a scraper or screwdriver downwardly the scratch to open information technology into a wide V.
Catalyzing
Catalyzing Polyester Resin
The hardener for gelcoat is the aforementioned every bit for whatever polyester resin — methyl ethyl ketone peroxide, or MEKP. Gelcoat resin usually requires one to ii percent of hardener by volume (follow the manufacturer's instructions). Equally a full general dominion, four drops of hardener will catalyze 1 ounce of resin at i percent. The mix shouldn't kicking (first to harden) in less than 30 minutes. Hardening in about two hours is probably ideal. Always err on the side of besides niggling hardener. Also be certain to stir in the hardener thoroughly; if you neglect to catalyze every bit of the resin, parts of the repair volition exist undercured.
Spreading Gelcoat Paste
Spreading Gelcoat Paste
Work the gelcoat paste into the scratch with a flexible plastic spreader. Let the putty bulge a footling backside the spreader; polyester resin shrinks slightly every bit it cures, and y'all're going to sand the patch anyway. Only don't permit information technology burl besides much or you'll make extra work for yourself.
Scrape upwards any excess paste beyond the patch area.
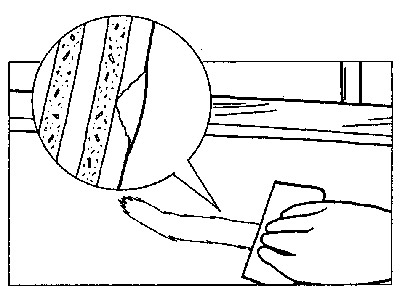
Roofing the Repair
Gelcoat will non fully cure in air. To seal the surface of a scratch repair, cover it with a sheet of plastic film. The kit may include sealing flick. Otherwise a section of kitchen "zipper" bag works peculiarly well because it tends to remain smooth and the gelcoat will not adhere to it. Record i border of the plastic to the surface merely beyond the repair, then smooth the plastic onto the gelcoat and record down the remaining sides.
Sanding and Polishing
Sanding and Polishing
After 24 hours, peel abroad the plastic. The corporeality of sanding required will depend on how smoothly you lot applied the gelcoat.
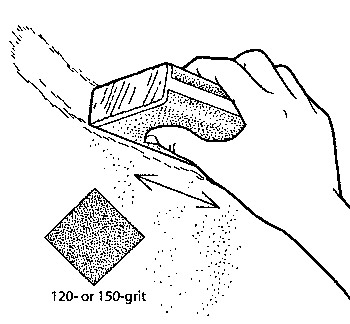
A 5 1/2-inch length of 1 x 2 makes a convenient sanding block for a scratch repair. Wrap the cake with a quarter sail of 150-grit paper. Utilise the edge of the block to confine your sanding to the new gelcoat. Employ brusk strokes, taking care that the paper is sanding only the patch and not the surrounding surface. Never do this initial sanding without a block backing the paper.
When the new gelcoat is flush, put 220-grit wet-or-dry newspaper on your block and moisture sand the repair, this time with your block flat. Use a circular motion and keep a trickle of h2o running on the sanding area. Feather the repair into the old gelcoat until your fingertips cannot detect a ridge. If the hull is curved, take care non to sand the repair apartment.
Abandon the cake and switch to 400-grit wet-or-dry out paper. Wet sand the surface until the repair surface area has a uniform advent. Follow this with 600-grit moisture-or dry out. Wear cloth garden gloves — the kind with the hard dots — to save the tips of your fingers.
Dry the area and use rubbing compound to give the gelcoat a high gloss. Swirl a soft, folded cloth over the surface of the compound to load the cloth, and then rub the compound onto the repair area. Vitrify it with a circular motion, using heavy pressure initially, so progressively reduce the pressure until the surface becomes glassy. If the gelcoat shows swirl marks, buff them out with a very fine finishing chemical compound.
Finish the chore past giving the repair area a fresh coat of wax. If your color match is reasonably good, the repair will be well-nigh undetectable.
Writer
Don Casey
Correspondent, BoatUS Mag
Don Casey has been one of the most consulted experts on gunkhole care and upgrades for 30 years, and is one of the BoatUS Magazine's panel of experts. He and his married woman cruise aboard their thirty-footer function of the year in the eastern Caribbean. His books include Don Casey's Complete Illustrated Sailboat Maintenance Manual, and the recently updated This Quondam Gunkhole, the bible for do-it-yourself boaters.
BoatUS Magazine Is A Benefit Of BoatUS Membership
Membership Benefits Include:
-
Subscription to the print version of BoatUS Magazine
-
4% back on purchases from West Marine stores or online at WestMarine.com
-
Discounts on fuel, transient slips, repairs and more at over one,200 businesses
-
Deals on cruises, charters, car rentals, hotel stays and more than…
-
All for merely $25/twelvemonth!

How To Repair Fiberglass Scrapes,
Source: https://www.boatus.com/expert-advice/expert-advice-archive/2012/july/gelcoat-scratch-repair
Posted by: johnsonnoteduckers.blogspot.com
0 Response to "How To Repair Fiberglass Scrapes"
Post a Comment