

How To Install A Brush Guard On A Dodge Ram
Best Sellers
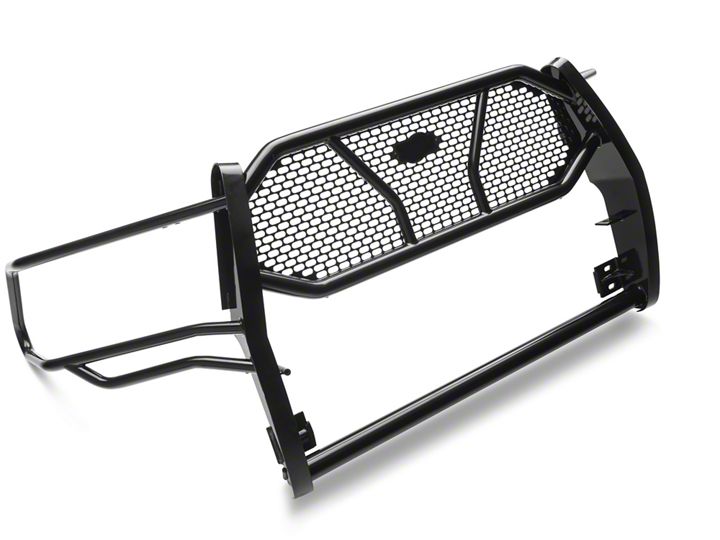
How to Install Steel Craft HD Grille Guard - Black on your Ram
Installation Time
1 hours
Shop Parts in this Guide
- HD Grille Guard; Black (09-18 RAM 1500, Excluding Express, Sport & Rebel)
PARTS Listing:

PROCEDURE:
1. REMOVE CONTENTS FROM BOX. VERIFY ALL PARTS ARE PRESENT. READ INSTRUCTIONS Advisedly Before STARTING INSTALLATION. Aid IS RECOMMENDED. EXCLUDES ALL MODELS WITH Full 1-Piece PLASTIC BUMPER COVER.
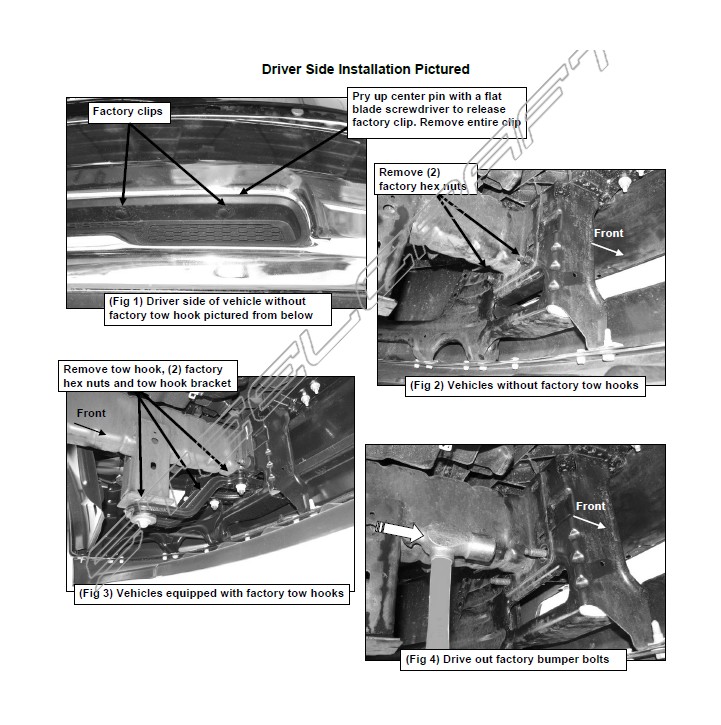
2. Determine if the vehicle is equipped with or without the mill tow hooks. On vehicles without factory tow hooks: Remove the plastic fill panel on the front end bumper past removing the two-piece plastic clips at the top of the console, (Figure 1). Notation: Apply a apartment-blade screwdriver to first pop the heart pin out to release the clip. Next, from behind the driver side of the forepart bumper, remove the (2) hex basics on the bottom of the bumper subclass securing the bumper to the frame, (Effigy ii). On vehicles with factory tow hooks: Start the installation on the driver side, behind the front end bumper. Remove the manufactory tow claw, (Figure 3). Remove the two hex nuts on the bottom of the bumper bracket securing the two-bolt tow hook mounting bracket to the frame.
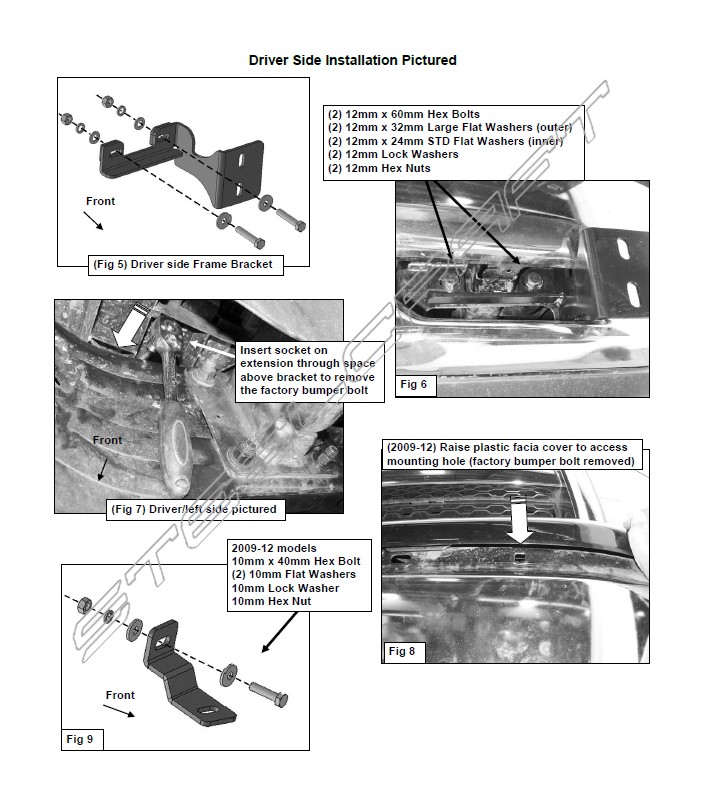
3. Next, drive the (2) carriage bolts in the bumper bracket out of the bracket by striking the finish of the bolts with a hammer, (Effigy four). Discard the tin retaining washers. Insert the driver side Mounting Bracket into the opening in the front of the bumper. Line upwardly the (ii) mounting holes with the holes in the bumper bracket. Insert (2) 12mm x 60mm Hex Bolts and (2) 12mm x 32mm OD Large Flat Washers through the driver side Frame Mounting Subclass and bumper bracket. Use the supplied (2) 12mm x 24mm Flat Washers, (2) 12mm Lock Washers and (ii) 12mm Hex Nuts, (Figures 5 & 6). Snug only do not tighten hardware.
On vehicles with manufacturing plant tow hooks: Reinstall the factory 2-bolt tow hook bracket and secure with the supplied (two) 12mm 10 24mm Flat Washers, (2) 12mm Lock Washers and (ii) 12mm Hex Nuts. Snug but do not tighten hardware at this time. Reinstall the tow claw using the factory hardware.
4. Repeat Steps ii & 3 to install the rider/right Frame Bracket.
five. Next, make up one's mind the correct process for your model year.
2009-12 Models:
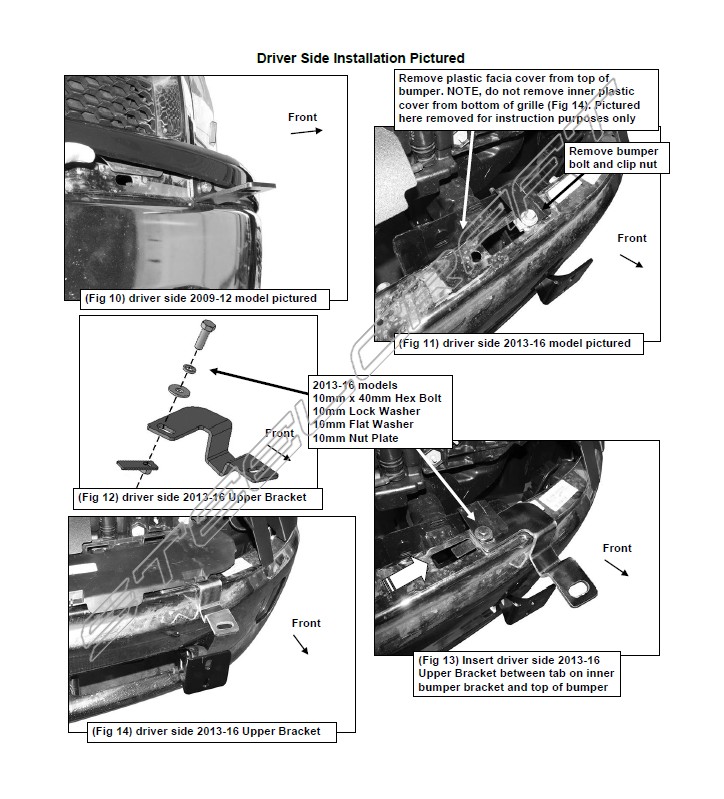
a. Advisedly pull up on the plastic bumper cover, (on acme of the bumper), to locate the carriage commodities securing the top of the steel bumper to the inner bumper bracket. Remove the carriage bolt, (Figures seven & 8). Notation: Employ a socket with extension to attain the hex nut on the carriage bolt from behind the bumper. Admission the hex nut from to a higher place the bumper bracket, (Figure seven).
b. Attach the commuter side 09-12 Top Mounting Bracket to the bumper by inserting (1) 10mm x 40mm Hex Bolt and (1) 10mm Apartment Washer through the Bracket and hole in the bumper, (Figures 9 & 10). Secure with (1) 10mm Apartment Washer, (1) 10mm Lock Washer and (1) 10mm Hex Nut. Exercise not tighten hardware at this fourth dimension.
c. Repeat Steps a & b for passenger side Upper Bracket installation.
2013-16 Models:
a. Remove the plastic facia embrace from the top of the bumper, (Figure 11).
b. Elevator up on the plastic inner cover to locate the top bumper commodities, (Figure xiv). Remove the commodities and clip nut. Insert the driver side 2022-16 Upper Bracket betwixt the tab on the inner bumper bracket and the meridian of the bumper, (Figure 13).
c. Insert (i) 10mm Nut Plate into the slot in the top of the bumper. Line up the Nut Plate with the holes in the Upper Bracket and the inner bumper bracket. Attach the Upper Bracket to the Nut Plate with (ane) 10mm ten 40mm Hex Commodities, (ane) 10mm Lock Washer and (1) 10mm Apartment Washer inserted down through the tab on the factory bumper bracket, the Upper Bracket, the bumper and into the Nut Plate, (Figure 12-xiv). Practice not fully tighten at this time.
d. Repeat Steps a-c for passenger side Upper Bracket installation.
e. Reinstall the plastic facia cover on the top of the bumper but leave loose.
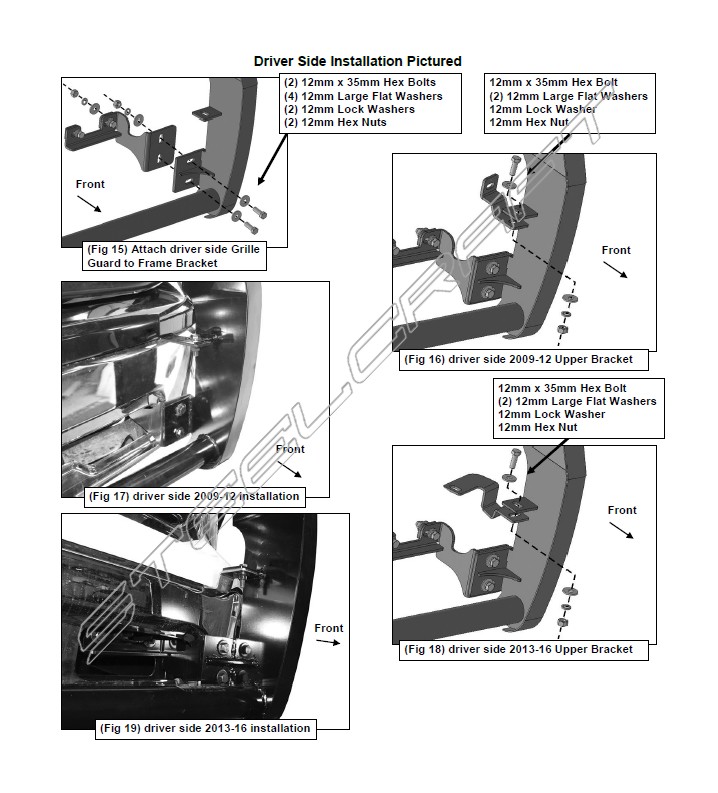
6. With assistance, position the Grille Guard upwardly to the Frame Mounting Brackets and on top of the Upper Mounting Brackets. Use the included (4) 12mm x 35mm Hex Bolts, (viii) 12mm STD Flat Washers, (4) 12mm Lock Washers and (4) 12mm Hex Basics to attach the Grille Guard to the Frame Mounting Brackets, (Figure xv). Snug merely do not tighten at this time.
vii. Attach the Grille Guard to the Upper Brackets using the included (2) 12mm x 35mm Hex Bolts, (4) 12mm STD Apartment Washers, (2) 12mm Lock Washers and (2) 12mm Hex Basics, (Figures 16-19). Snug but practise non tighten hardware at this time.
eight. Next, open the hood. Locate and remove the inner top mounting spiral attaching the headlight assembly to the radiator cantankerous member, (Effigy 20). Select the diver side Acme Support Bracket. Insert the Support Bracket between the tab on the headlight and the cantankerous member. Reuse the factory screw to attach the Back up Bracket, (Figure 21).
9. Line up the Support Bracket with the (2) mounting holes in the bottom of the headlight guard. Attach the Bracket to the Grille Guard with (2) 8mm Push button Head Screws, (2) 8mm Lock Washers and (2) 8mm Flat washers, (Figures 22 & 23). Practice non fully tighten at this time.
10. Repeat Steps eight & nine to attach the passenger side Top Back up Bracket.
eleven. With assist, align and accommodate the Grille Guard and tighten all hardware including the Tiptop Mounting Bracket and tow hook hardware. IMPORTANT: On 2022-16 models, terminate reattaching the plastic facia cover to the bumper after Upper Bracket to bumper hardware has been adjusted and fully tightened.
12. On vehicles without factory tow hooks: The plastic fill console in the front bumper removed in Pace 2 may be discarded or can exist reinstalled but will crave cutting to clear the Frame Mounting Brackets. Once modified, use the factory hardware to reinstall.
thirteen. Do periodic inspections to the installation to brand sure that all hardware is secure and tight.
To protect your investment, wax this product after installing. Regular waxing is recommended to add a protective layer over the finish. Practice not use whatever type of smooth or wax that may contain abrasives that could damage the stop. For stainless steel: Aluminum smoothen may be used to polish small scratches and scuffs on the end. Mild soap may be used also to make clean the Grille Guard.
For gloss black finishes: Mild soap may exist used to clean the Grille Guard
Driver Side Installation Pictured
Best Sellers

FORD, FORD F-150 & F-150, FORD F-250 & F-250, FORD F-350 & F-350, FORD RANGER, FORD LIGHTNING, SUPERCREW, SUPERCAB, Power STROKE, TRITON V8, ECOBOOST, SUPERDUTY, ARE REGISTERED TRADEMARKS OF THE FORD MOTOR Visitor. ECOBOOST, CHEVROLET, GMC, CHEVROLET SILVERADO, GMC SIERRA, SILVERADO, SIERRA,DENALI,VORTEC LS V8, DURAMAX, LTZ, SILVERADO LT, SILVERADO Hd, SIERRA ALL TERRAIN Ten, ECOTEC3, Z-71, SILVERADO 1500, AND SILVERADO SS ARE REGISTERED TRADEMARKS OF GENERAL MOTORS COMPANY (GM). DODGE, DODGE RAM, RAM TRUCKS, RAM 1500, RAM 2500, RAM 3500, SRT/x, 1500 SLT PLUS, 1500 SLT, ST, LARAMIE, DAYTONA, MEGA CAB, SLT/SPORT/TRX, SLT/TRX, R/T, SPORT, LARAMIE LONGHORN, TRADESMAN HEAVY DUTY, TRADESMAN/EXPRESS, TRADESMAN, HFE, REBEL, LONGHORN ARE REGISTERED TRADEMARKS OF FIAT CHRYSLER AUTOMOBILES (FCA). ALLISON TRANSMISSION IS A REGISTERED TRADEMARK OF ALLISON TRANSMISSION, INC. CUMMINS IS A REGISTERED TRADEMARK OF CUMMINS INC. SALEEN IS A REGISTERED TRADEMARK OF SALEEN INCORPORATED. ROUSH IS A REGISTERED TRADEMARK OF ROUSH ENTERPRISES, INC. AMERICANTRUCKS HAS NO Amalgamation WITH THE FORD MOTOR Company, CUMMINS, INC., ALLISON TRANSMISSION, INC., ROUSH ENTERPRISES, SALEEN, THE Full general MOTORS COMPANY OR FIAT CHRYSLER AUTOMOBILES. THROUGHOUT OUR WEBSITE AND OUR AMERICANTRUCKS SIERRA, RAM, AND SILVERADO CATALOG THESE TERMS ARE USED FOR IDENTIFICATION PURPOSES ONLY. 2022 AMERICANTRUCKS.COM. ALL RIGHTS RESERVED

Source: https://www.americantrucks.com/steelcraft-hd-grille-guard-blk-0917ram-manu-install.html
Posted by: johnsonnoteduckers.blogspot.com
0 Response to "How To Install A Brush Guard On A Dodge Ram"
Post a Comment